
Sarah is one of my oldest and dearest friends. We've known each other since we were 13 and have been through a lot over the years. One thing I love about Sarah is that she really gets me. She is one of the few who knows me through and through, and I think I can say the same about her. We know each other's good and bad and accept both sides equally and still love each other for it (or despite it!).
Recently Sarah and I got together and I had asked her if there was anything she would like me to bake for her that I could bring to our rendezvous. Being 5 months pregnant, she didn't have much problem choosing something she craved! Her request was simple - chocolate and lots of it, just no dark or white chocolate. Easy!

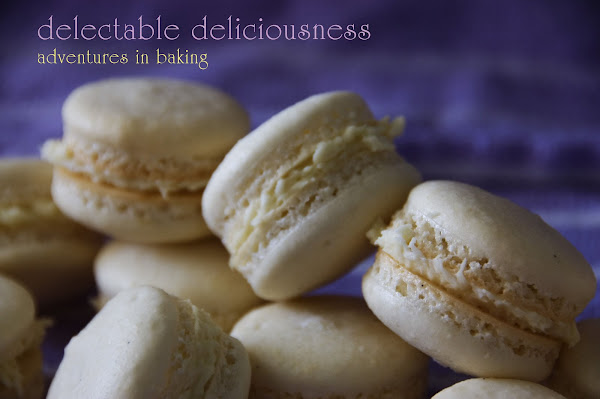
I knew just the cake I wanted to make. The first time I made this cake was well over a year and a half ago. I don't recall why I first made this cake, but I really lucked out on finding this incredible recipe. I found it on Epicurious and at the time chose it because it had many positive reviews. I've since learned it's the most clicked on chocolate cake recipe on Epicurious! Not surprising if you ask me, this cake is amazing! The cake itself is very moist and has a deep, rich chocolate flavor.

I wanted to add a bit more flavor than just chocolate, so I decided to use a browned butter caramel frosting as the filling and top the cake with a simple chocolate ganache. I've also made the caramel frosting before as well, and it's one of the best I've ever made. I thought it would fit really well with this cake and it was worth the effort to make.
The final product was met with rave reviews and was proclaimed "almost gone!" by the next day, which is always a good sign :)

Double Chocolate Layer Cake
adapted from Epicurious.com
*note: this recipe makes a lot of batter. It calls for two 10-inch round pans to be used. I don't have this size, so I usually make it in two 9-inch round pans and use the remaining batter to make cupcakes. I've also used it in a 10 cup bundt pan and still have enough batter left over for some cupcakes. Be careful to not overfill your bundt pan if using one - I've made this mistake before and it's not pretty!
3 ounces of good quality semisweet chocolate, chopped fine
1 1/2 cups hot brewed coffee (this does not impart a coffee flavor to the cake, it enhances the chocolate flavor)
3 cups sugar
2 1/2 cups all purpose flour
1 1/2 cups unsweetened cocoa powder (not dutch proccessed)
2 teaspoons baking soda
3/4 teaspoon baking powder
1 1/4 teaspoons salt
3 large eggs
3/4 cup vegetable oil
1 1/2 cups well-shaken buttermilk
3/4 teaspoon vanilla
1. Preheat oven to 300°F. Spray 2 10-inch round baking pans with non-stick spray.
2. Combine finely chopped chocolate with the hot coffee and let mixture stand, stirring occasionally.
3. Into a large bowl, sift together the sugar, flour, cocoa powder, baking soda, baking powder, and salt; set aside.
4. In another large bowl with an electric mixer beat eggs until thickened slightly and lemon colored (about 3 minutes with a standing mixer or 5 minutes with a hand-held mixer). Slowly add oil, buttermilk, vanilla, and melted chocolate mixture to eggs, beating until combined well. Add sugar mixture and beat on medium speed until just combined.
5. Pour batter into prepared pans and bake for approximately 1 hour or until a toothpick inserted into the center comes out clean.
Browned Butter Caramel Frosting
adapted from Shuna Fish Lydon
To start, you need to make the caramel syrup. The process might seem intimidating at first, but is fairly easy to execute. Just be careful not to burn yourself!

Caramel Syrup
2 cups sugar
1/2 cup water
1 cup water for 'stopping'
1. In a saucepan with tall sides, mix sugar and 1/2 cup water until it feels like wet sand. (brush down any stray sugar on sides of the pan with a wet pastry brush)
2. Cook over high heat until the color of the mixture turns deep amber. Do not stir the mixture as it cooks - a simple swirlling of the pan will suffice.
3. When color is achieved, remove pan from heat and pour in the remaining 1 cup of water. The mixture will bubble up and sputter and practically jump out of the pan at you, so be careful! I use a piece of foil with a hole in the center to cover the pan and still be able to pour the water in with less incidence of the syrup splattering out.
4. Return the pan to medium heat, whisking constantly until the mixture is slightly sticky between two fingers (let mixture cool before testing this! It's extremely hot!)
To make the frosting:
12 tablespoons (1 1/2 sticks) of unsalted butter
1 pound of powdered sugar, sifted (you might not need all of it, depending on your taste)
4-6 tablespoons heavy cream
2 teaspoons vanilla extract
2-4 tablespoons caramel syrup
pinch of salt (or to taste)
1. Cook the butter until brown and has a slightly nutty smell.
2. Strain browned butter through a fine mesh sieve and set aside to cool.
3. Pour cooled butter into a mixer bowl.
4. Using either a paddle or whisk attachment, beat the butter while adding the powdered sugar a little bit at a time. Once mixture gets too thick, add some of the cream and/or the caramel syrup a little at a time. Repeat until the mixture is smooth and add the vanilla extract and salt.

Chocolate ganache
1 pound good quality chocolate, chopped fine
1 cup heavy cream
1. Place chopped chocolate into a heat proof bowl.
2. Heat the cream over medium-high heat just until boiling. Remove from heat and pour over chopped chocolate. Let sit for about 2 minutes.
3. Whisk the cream/chocolate mixture until smooth. Let cool to desired consistancy before frosting your cake.